Go Back
A smiling child wearing a white dress, a blonde wig, and a tiara stands in front of a birthday cake shaped like a princess. The table is decorated with cupcakes topped with purple frosting and balloons in the background.

Disney Princess Cake

This Disney Princess Cake is every little princess's dream come true! Transform Elsa, Rapunzel, or any other Disney princess into a magical birthday cake!
Prep Time 10 minutes
Cook Time 1 hour
Decorating 20 minutes
Total Time 1 hour 30 minutes
Servings: 10 servings
Course: Dessert
Cuisine: American

Ingredients
  

  • 2 cake mixes made according to package directions
  • Disney Princess Barbie doll
  • 6 cups vanilla or buttercream frosting

Equipment

  • 8 inch Baking Pan
  • Mixing Bowls
  • Hand Mixer

Method
 

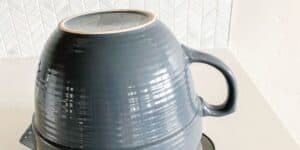
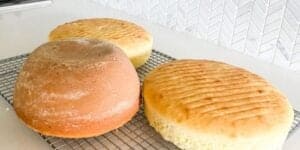
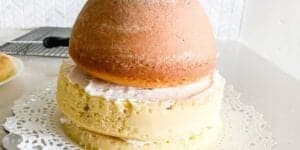
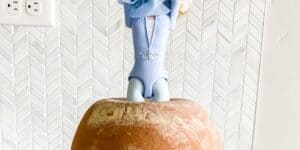
  1. Step 1: In a large bowl, make up cake batter for both cake mixes. *Optional – for a more dense and moist cake substitute half of the water for the same amount of sour cream.
    Grease and flour an 8" pan and a ceramic medium oven-safe bowl or a medium-sized and small glass oven-safe bowl (see notes above). Spray pans with cooking spray (or grease with butter) and dust lightly with flour. Turn upside-down and tap the bowl to get rid of excess flour.
    A dark gray ceramic bowl with a handle is placed upside down on a light-colored countertop. In the background, there is a white, textured backsplash with a geometric pattern. The bowl has a glossy finish and visible ridges.
  2. Step 2: Fill with batter until they are a little over ¾ full. Use remaining batter for cup cakes.
    Bake at 325 for about an hour or until the center feels set (checking after 30 minutes). If you are using a cake pan for one of the layers, check after 20 minutes.
    Three round loaves of bread cooling on a wire rack on a white countertop. The bread in the foreground is darker and crustier, while the other two loaves are lighter in color with a smooth, slightly impressed pattern on top. The background features white herringbone tiles.
  3. Step 3: About 10 minutes after you remove the cake from the oven, turn out of bowl onto wax paper. This prevents the cake from sweating and sticking to the bowl.
    Stick the cakes in the freezer for a few hours or overnight until they are really firm.
    Layer the small cake onto the large cake and trim any over hang.
    A partially assembled cake with a domed top sits on a doily in a kitchen. The cake has a layer of white frosting between the two tiers. A cooling rack and knife are visible in the background. The wall has a white, geometric-patterned backsplash.
  4. Step 4: Stick your Barbie princess in the center of the cake and frost over her upper half to make it look like a dress.
    A decorative figurine of Elsa from Disney's Frozen is placed upside down in a large loaf of bread. The background features a white herringbone-patterned wall with a visible power outlet on the left.
  5. Step 5: Layer with a thin layer of frosting to create a "crumb coat".
    A white frosted cake topped with a small, light blue figure wearing a suit. The background features a subtle chevron pattern. The overall scene is minimalist and the cake appears to be the main focus.
  6. Step 6: Make frosting (see link above) and decorate.
    A close-up image shows a round cake decorated with intricate, swirled blue and lavender frosting. The cake is being finished with white frosting applied with a piping tool. The background is blurred, highlighting the cake's texture and delicate design.

Notes

  • Nutrition represents a standard white cake mix with buttercream frosting. Nutritional values of other flavors may vary.
  • If you would rather make the dress with fondant, you can use our fondant recipe instead.
  • Use extra batter to make cupcakes and place them around the base of the cake, this looks especially pretty if you have the princess cake up on a raised cake plate.