

There’s no holiday more likely to put a witch in good spirits than Halloween. And there’s no hag more suited than Ursula — with her purple face, flyaway hair, and sinister grin — to lend a haunting appearance to your family’s digs. Fashioned from a plastic gallon jug and a paper mask, this spooky DIY craft from DisneyFamily makes a great greeter for costume party guests or trick-or-treaters.

Time: 25 Minutes
What You’ll Need:
- – Scissors
- – Medium or heavy weight scrapbook paper or cardstock (lavender, gray, turquoise, red, white, and purple)
- – Black marker
- – Glue stick
- – Glue dots
- – Small faux gems
- – Empty plastic gallon milk or water jug
- – Water
- – Purple food coloring (optional)
- – White and/or purple tulle or other lightweight stiff fabric
- – Clear packing tape
- – Regular paper (optional)
Bonus Tip!
BONUS TIP: Consider planning and booking your next Disney trip with an Authorized Disney Vacation Planner you can trust like Mickey Travels. They’ll help you get the best Disney travel deal, share expert advice and their services are totally FREE! It’s genius! Discover More >
How To Make It:
1. Print the first page of the template on lavender paper or cardstock and cut out the pieces. Print the second page on plain paper and use the pieces as patterns for cutting the shapes from the specified colors of paper or cardstock.
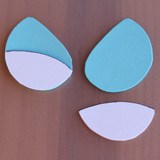
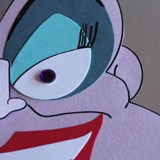
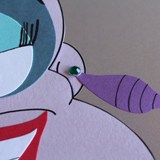
2. Outline the upper edge of the eye whites and then glue them to the bottoms of the eyelid pieces, as shown.
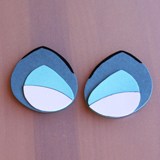
3. Draw eyebrows on the upper edges of the eye shading pieces.
4. Then glue the eyes atop them, aligning the inner lower edges as shown. Add faux gem eye pupils and draw lashes on the outer corners of the eyelids.
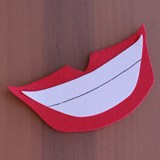
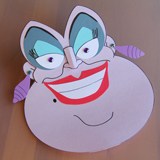
5. Draw a thin line across the teeth piece to separate the upper and lower set. Then glue the teeth onto the mouth.
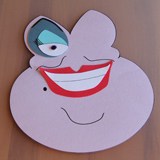
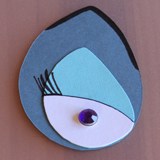
6. Glue the eyes and mouth in place on the face.
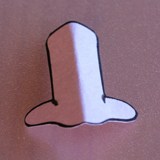
7. Fold the nose in half vertically to create a crease down the center (this will give it more dimension).
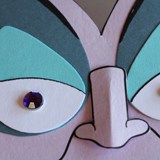
8. Use a glue dot to stick the top edge in place between the eyes.
9. Attach the ears by gluing the inner edges to the back of the face.
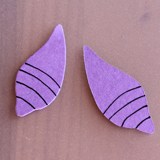
10. Draw a few groove lines on the shell earrings.
11. Glue the earrings to the ears.
12. Embellish the tops with mini faux gems.
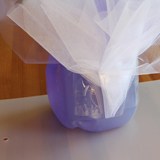
13. Fill a plastic gallon jug with water (if you tint it pale purple, it will look all the more like Ursula) and fasten the cap securely. Next, use clear packing tape to attach two or three bunched pieces of tulle or other stiff fabric to the upper portion of one of the jug panels, as shown, for Ursula’s hair.
14. Use rolled pieces of packing tape or glue dots to attach the assembled face to the jug, positioning it so that the tulle hair juts out from behind the tops of the eyes and the sides above the ears. Then pick a place to perch your Spooky Ursula jug where visitors are sure to see her.
Note: Cutting should be done by an adult.
Source: DisneyFamily


