

“Oh, I don’t know why, but I’ve always loved the idea of summer, and sun, and all things hot!” – Olaf. We couldn't agree more Olaf… but sure enough fall has arrived. So, why not bring a touch of Olaf's sweetness to this crispy, sweater-weather season?! Thanks to DisneyFamily, you can create your own jack-o’-lantern inspired by the lovable snowman from Disney’s Frozen. The great thing about this version of Olaf? He won’t melt.
What You’ll Need:
- – Pumpkin(s)
- – Pumpkin carving kit
- – Water-based marker (optional)
- – Paper towels
- – Clear tape
- – Toothpicks
- – Small tree sticks
Directions:
1. There are two ways to transfer your design onto the pumpkin. One is to copy it freehand onto a clean, dry pumpkin with a water-based marker (mistakes can be easily corrected with a paper towel). The other is to tape your template to the pumpkin, then score the design into the skin by poking holes through the template with a nail or plastic poking tool (available in some pumpkin-carving kits).
Bonus Tip!
BONUS TIP: Consider planning and booking your next Disney trip with an Authorized Disney Vacation Planner you can trust like Mickey Travels. They’ll help you get the best Disney travel deal, share expert advice and their services are totally FREE! It’s genius! Discover More >
2. Carve by starting at the center of your design and working outward (this avoids putting pressure on areas already carved). Begin with the innermost and smallest details. As each shape loosens up, gently push it out of the pumpkin with a finger or a dull pencil point (a good job for young kids).
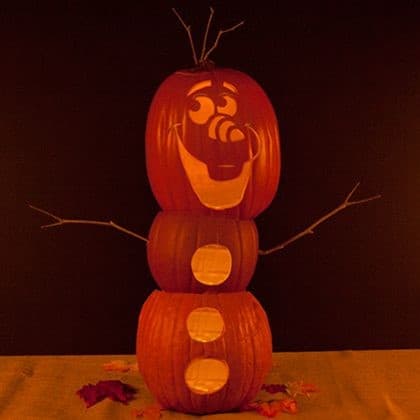
3. Optional: use 2 more pumpkins (1 slightly smaller than his head and 1 slightly larger) to create Olaf’s body. Cut 1 circle in the middle pumpkin and 2 circles in the bottom pumpkin (these are his buttons). Cut the tops off of the 2 pumpkins that make up his body so the pumpkins sit carefully inside one another.Use 3 small tree sticks and put them on top of his head. Use 2 small tree sticks to create arms (put 1 on each side of the middle pumpkin).Carefully stack all of the pumpkins in order and make sure he’s in a safe place where he can’t topple over!
4. Lastly, put your jack-o’-lantern in a place of honor (away from flammables), and remember to blow out all candles before you go to sleep.
5. Additional Information: If you cut something you didn’t intend to stick a toothpick through the flesh side of the piece and fit it back into place. Cutting should be done by an adult.
Source: DisneyFamily


