
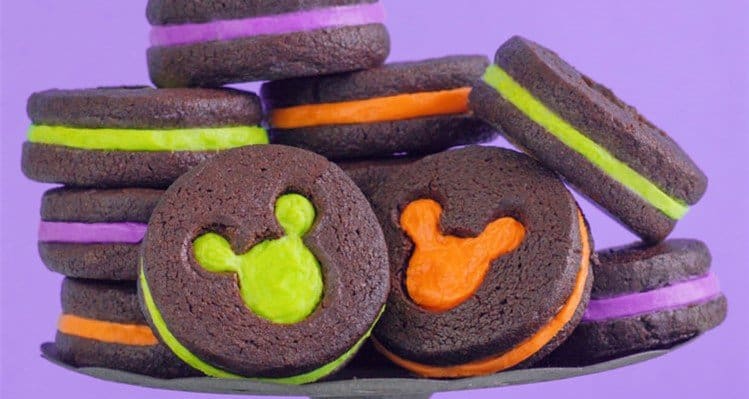
With the spooky season upon us, what better way to celebrate than with some colorful Hidden Mickey Halloween Cookies from DisneyFamily?! The chocolate cookie outside and gooey cream center will have all the little ghosts and ghouls asking for more. Oh, boy!

Hidden Mickey Halloween Cookies
Ingredients:
- Cookie Ingredients:
- 1 cup (2 sticks) unsalted butter, melted and slightly cooled
- 3/4 cup sugar
- 1 teaspoon vanilla extract
- 1 cup semisweet chocolate chips, melted and slightly cooled
- 1 egg
- 1 1/2 cups unbleached all-purpose flour
- 3/4 cup cocoa powder (Dutch-processed recommended)
- 1 teaspoon kosher salt
- 1/2 teaspoon baking soda
- Filling Ingredients:
- 1/2 cup unsalted butter, softened
- 1 2/3 cup confectioners’ sugar
- 1 teaspoon vanilla extract
- 1 tablespoon milk
- Pinch of salt
- Food coloring (purple, green, orange)
Bonus Tip!
BONUS TIP: Consider planning and booking your next Disney trip with an Authorized Disney Vacation Planner you can trust like Mickey Travels. They’ll help you get the best Disney travel deal, share expert advice and their services are totally FREE! It’s genius! Discover More >
Directions:
1. In a medium bowl, whisk together the butter and sugar until well combined. Whisk in the vanilla and melted chocolate. Add in the egg and whisk until combined.

2. In another bowl, stir flour, cocoa, salt, and baking soda until combined. Stir flour mixture into the chocolate mixture. Let the dough sit for an hour to firm up.
3. Transfer the dough to a sheet of wax paper. Shape into a log about 2 1/2 inches in diameter. Roll log in wax paper and shape as you roll to maintain a smooth cylinder. Twist ends of paper to help keep the shape compact. Refrigerate for at least 2 hours or until firm. (If log flattens on one side, rotate every 30 minutes or so to maintain a round shape.)
4. Heat oven to 325° and line a baking sheet with parchment paper.
5. Cut dough in 1/4-inch thick slices and place on prepared baking sheet.
6. Use a 2’’ round pastry cutter to cut out a smooth circle for each slice.

7. Cut out a Mickey shape on half of the slices (in the middle of each) using a 3/4″ round pastry cutter for the head and the back of a large, round pastry tip for the ears.
8. Bake for about 15 minutes or until cookies are firm to the touch.
9. Cool and prepare the filling. In a mixer, beat the butter until smooth and creamy. Add sugar and vanilla and beat until smooth. Add milk and salt, and continue beating until smooth again. Then add preferred food coloring.
10. Place filling into a pastry bag and pipe filling on the bottom of the plain cookies and sandwich Mickey cutout cookies on top.
Source: DisneyFamily


