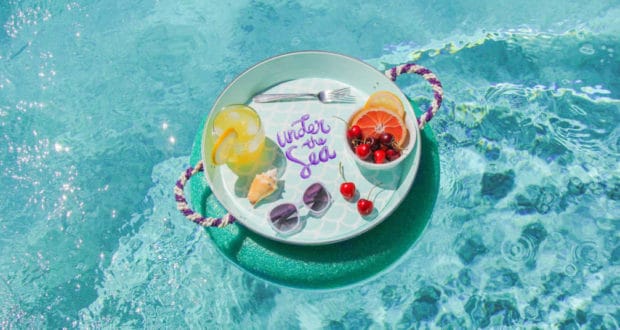
Turn a regular tray into a floating buffet as shared by Family.Disney.com! Have a blast making a splash in your own backyard with the help of this Little Mermaid Pool Tray you can make for your Disney-loving family. All you’ll need is a round, lightweight tray, a pool noodle, and lots of mermaid flair to create this fun floater with your kiddo! Scroll through to “sea” how easy it is to DIY.

What You’ll Need:
- Teal plastic or metal tray (or plain tray that you paint teal)
- Small paintbrush
- Medium purple, dark purple, white, and silver paint
- Strings of shells
- Waterproof or resistant glue
- Teal pool noodle
- Scissors
- Zip ties
How To Make It

Bonus Tip!
BONUS TIP: Consider planning and booking your next Disney trip with an Authorized Disney Vacation Planner you can trust like Mickey Travels. They’ll help you get the best Disney travel deal, share expert advice and their services are totally FREE! It’s genius! Discover More >
1. Start by painting a mermaid scale pattern with white paint onto the tray. You can go back over the design with another coat of paint if you need to. Let dry.

2. Next, paint on your quote. Use medium purple paint for the base, then add dark purple shadows and silver highlights. Let dry.

3. Paint 2 strands of shells purple and leave 2 natural. Let dry.
4. Coat the painted tray and shells with the waterproof or resistant seal. Let dry.
5. Glue 1 end of the purple strand under 1 side of the handle and wrap it loosely around to the other side. Glue again. Then, repeat with the other side.

6. Repeat with the natural shells, wrapping them in-between the purple strands to create a striped effect. Let dry.
7. Next, take the pool noodle and bend it into a circle. Before you attach it together, place the tray on top to confirm if it will fit nicely. If you need to, you can use scissors to cut the noodle down.

8. Thread 4-5 zip ties through 1 end of the noodle going from the outside to the inside. Take the ends of the zip ties and thread them through the other end of the noodle. Tighten all the ties and cut off the ends.
9. Glue the bottom of the tray to the pool noodle ring. Follow instructions on the glue bottle for letting it cure.

10. Once the glue has fully set, enjoy in the pool!
Notes: All cutting and gluing should be done by an adult.
Source: Family.Disney.com