
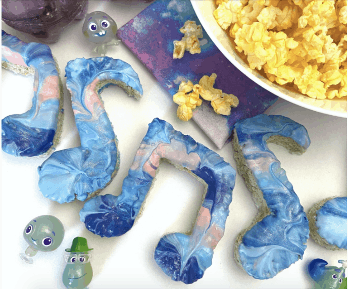
Soul on Disney+ is a great movie that brings music and soul to the big screen. You can enjoy a fun, classic treat with a little twist with these music note rice cereal treats covered with colorful candy melts. This might be just the spark you need.
What You’ll Need:
- -4 ⅔ cups rice cereal
- -10 Oz. mini marshmallows
- -3 Tbsp salted butter
- -8 x 8 square pan
- -Candy melts (white, royal blue, red, blue)
- -One medium-sized microwave-safe bowl
- -Three smaller microwave-safe bowls
- -Cooking spray
- -Music note cookie cutters
- -Parchment paper
- -Silicone spatula
- -Cookie sheet pan
- -Food color (optional)
- -Edible spray glitter (optional)
Bonus Tip!
BONUS TIP: Consider planning and booking your next Disney trip with an Authorized Disney Vacation Planner you can trust like Mickey Travels. They’ll help you get the best Disney travel deal, share expert advice and their services are totally FREE! It’s genius! Discover More >
Directions:
1. Put marshmallows and butter in a large microwave-safe bowl. Microwave for 1 minute. Stir. Continue to microwave at 15-second intervals, stirring each time, until the mixture is smooth and runny. Do not overcook. For colored treats, add food color to the melted mixture and stir.
2. Pour rice cereal into the mixture and stir thoroughly, making sure to scrape the bottom of the bowl.
3. Spray the inside of the pan with cooking spray. For an easier release, line the bottom with a piece of parchment paper (optional).
4. Pour the rice cereal mixture into the pan. Using your spatula, spread the mixture, pressing down firmly into the pan to make an even layer. It is helpful to dip your spatula in water (shaking off excess water) to prevent the mixture from sticking. Cool for 30 minutes.
5. Run a butter knife around the edge of the treats. Turn the pan upside down onto a cookie sheet lined with parchment paper, and tap the back of the pan to release.
6. Cut out shapes using cookie cutters. Clean off the cutters if the treats start to stick too much. Make sure the gaps between shapes aren’t too big, so that you’re able to get as many treats as possible. Keep the scraps for snacking! You can also form the scraps into different shapes with your hands — more fun for the kids! Place the cutout treats in the freezer for 5 minutes.
7. While treats are in the freezer, put candy melts in a microwave-safe bowl that is big enough to dip your treats in. For the main color, I mixed mostly white candy melts with a few royal blue to get a periwinkle color. Put your other colors in the smaller bowls.
8. Melt candy melts in the microwave according to the manufacturer instructions. Do not overcook as the melts will become too thick.
Working fairly quickly, spoon different-colored melted candy melts from the smaller bowls into the larger bowl of melted candy melts.
9. Shake the larger bowl back and forth to spread out the color; or, alternatively, you can use the back of a spoon. Do not overmix the colors into one another — the treats will look nicer if you don’t overmix!
10. Dip the treat in the candy melts, covering the top half. Lift and quickly shake off the extra candy melt, then flip over and shake to level out the candy melt. If there are gaps, you can quickly smooth out with the back of a spoon. Let the treats dry flat on a piece of parchment.
11. Repeat steps 9 through11 for each treat, adding more colors from your smaller bowls into the larger bowl. If the melted candy melts begin to cool and firm, microwave for 5–10 seconds. Candy melts must be loose and fully melted to have a nice result.
This recipe from Disney is a fun way to add some Soul to your movie watchin!
Source: news.disney.com

