
By now, you like many others are probably starting to feel the magnitude of winter’s unrelenting edge. The holiday season that brought in such warmth to contend with the external dip in temperatures outside now feels like a distant memory. And for most residents living in North America, there is no end in sight regarding when winter’s wrath will be blunted out by spring’s eagerly-awaited arrival. But don’t let the prospect of being cooped up indoors with your family in the coming weeks and months ahead become a boredom-based burden.
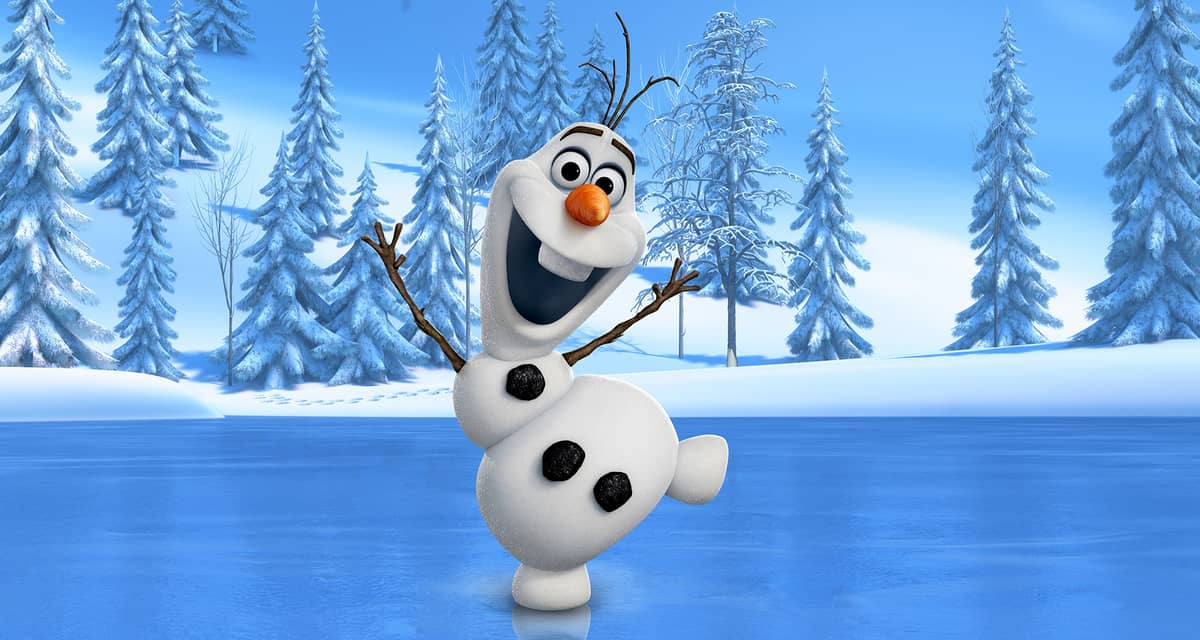
You can always turn to the magic of Disney-themed DIY crafts to do at home, any time of year, and in any season for some much-needed distractions. And in keeping with the idea of embracing winter wonders within the warm and comfy confines of your home, a focus on Disney’s popular Frozen franchise would be the most seasonal appropriate recommendation. More specifically, we’re placing the emphasis on the most revered, warm, and lovable snowman to ever be built into being — Olaf. From simple crafts that even the youngest Frozen fans can complete on their own to more structured step-by-step ideas that require adult supervision, here are 12 excellent Olaf-inspired DIYs to try this winter.
Related: Olaf Character Sighting Returning Soon to Disney’s Hollywood Studios
12. Cardboard Tube Olaf Craft
We’ve found several variations on multiple sites for this simple and low-maintenance kid-friendly activity. Here we’re featuring this one shared by Amanda Formaro on her awesome crafts site.
What You Need:
- A four-inch cardboard tube (from either a toilet paper or paper towel roll)
- White construction paper
- Black pom poms
- Orange pom poms
- Two googly craft eyes
- A fine-point black marker
- Two small branches or twigs (for arms)
- Three smaller twigs or leaf stems (for hair)
- A glue stick
- Scissors
- White craft glue
- A stick pin
- Toothpick
Directions:
Cover the cardboard tube in white construction paper using a glue stick. Then, cut two circles from additional white paper and glue them to the bottom of the tube for Olaf’s feet. Glue the black pom poms to the front of the cardboard tube. Roll the orange pom-pom between your palm to flatten it out a bit and glue it on the front of the tube for the nose. Next, glue the googly eyes above the pom-pom nose. Use a black pen to draw the eyebrows, smile, and tooth. The easiest way to make a hole in the side of the cardboard tube (for the arms) is to poke a stick pin through it first, then remove it and poke a toothpick into the hole to make it larger. Now you can poke the twigs through the hole. Glue the small twigs inside the top-front of the tube.

11. Olaf Popsicle Sticks Craft
Here’s another simple and fun project that even the youngest crafters can get into, shared by Hani at Craftionary. If your household has an insatiable appetite for popsicles and there is a resulting mound of popsicle sticks at your disposal then you’re already practically set! Here’s what else you’re going to need and how to pull it off!
Materials:
- Popsicle sticks
- Glue gun and glue
- Pipe cleaners
- Googly eyes
- Orange pom poms
- Sharpie
- Paint and paint brush
Directions:
Place seven popsicle sticks together. Use two sticks to join them together with hot glue.
While they are drying, painted the stack of sticks white on the front side. Once the paint is dried, use hot glue to adhere pipe cleaner hair, googly eyes, and pom pom nose. Depending on the side, you can use one or doubled-up pom poms to make an Olaf nose. Once everything is dry, use a Sharpie to draw on eyebrows and mouth.

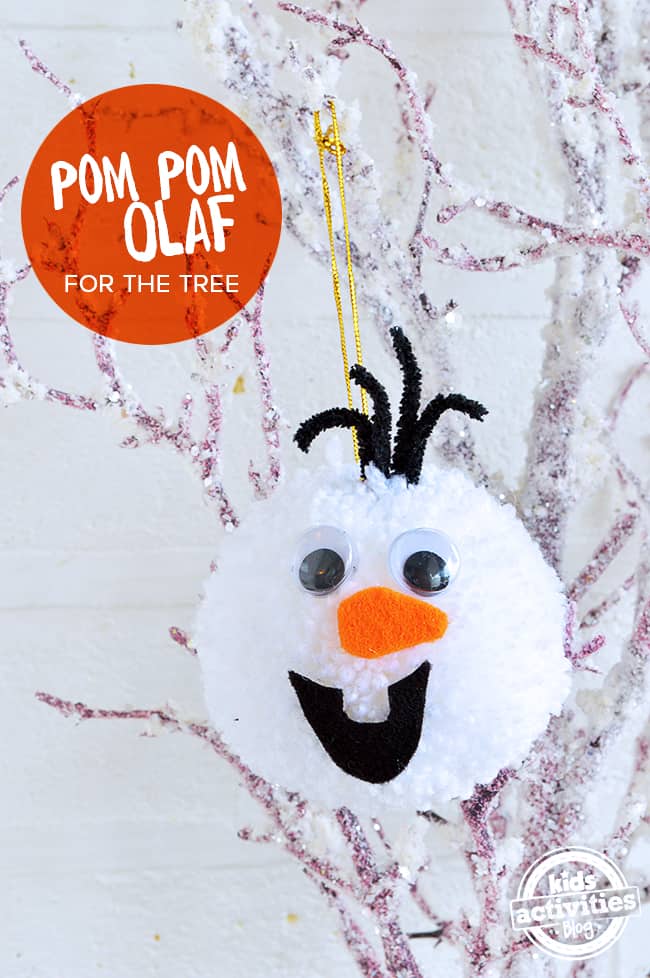
10. Olaf Frozen Pom Pom Decoration
This next craft is usually applied to making Christmas Tree ornaments, but they really can be made at any time of the year and serve as a hanging decoration in general. This project was originally shared by Michelle McInerney of MollyMoo Crafts and reprinted on Kids Activities Blog.
What You Need:
- Pom pom makers
- White yarn
- Goggly eyes
- Felt
- Ribbon
- Craft glue
Directions:
Make a pom pom with a large store-bought one you can find at most craft stores. Alternately, you can use cardboard discs or paper plates, but pom poms are softer. Glue on two googly eyes. It’s recommended to use either fabric glue or tacky glue. Cut a little triangle of orange felt for Olaf’s nose and glue it on. Cut a black piece of felt for the mouth and glue it on. Part the wool threads and glue thin pipe cleaners right down into the center of the pom pom. When dry and secured into position curl the pop poms, just like Olaf’s hair! Knot a length of wood or twine around the pom pom and use that to hang it.
Related: Disney Has A New DIY For You To Try This Autumn
9. Olaf Finger Puppet Pattern
Amy from The Idea Room presented this adorable little finger puppet activity to do with small children. It will just melt everyone’s heart!
Materials:
- White felt
- Black felt
- Brown felt
- Orange felt
- Two googly eyes
- Three black mini pom poms (optional)
- Hot glue and glue gun
- Black fine sharpie
- Olaf printable pattern
Directions:
Cut out the pattern pieces according to the directions on the printable pattern. Cut out the left and right arm. Glue to the front of the back body piece on the middle section. Do this so that the arms will go inside the finger puppet and the front body piece will go over the top of them. Place glue around the sides and the top of the front piece and the back piece of the body and glue them together. Be sure to only glue around the edges and NOT glue along the bottom. This is so you make a hole for the finger puppet.
Glue the cheeks, mouth and teeth to the Olaf. Take the nose and put a thin line hot glue down one side of the long part of the triangle nose. Roll the nose into a cone shape and hold while the glue sets. Be super careful not to burn yourself with the hot glue gun. Glue the google eyes onto the top of the cheeks and glue the nose right below them in the middle of the cheeks. Glue the black mini pom poms on for the buttons or cut the buttons out of black felt and glue in place. Draw the lines to separate the body (head, middle, bottom and the feet and to draw on his eyebrows).

8. Build Magnetic Olaf
For kids who are more scientific in nature, this activity can be both fun and educational. Made possible by The Crafter Life, this easy-to-follow hands-on craft with magnets is a very attractive one indeed.
What You Need:
- Felt (white, white with sparkles, black, brown, dark brown, light brown, beige, orange, light blue, and red)
- Pen
- Scissors
- Magnetic tape
- Hot glue gun/hot glue (optional)
- Printable(s) (optional)
Directions:
Sketch your own Olaf body parts on paper or use an online printable. You should have one head, two bottom body pieces, two legs, two arms, two eyebrows, three “hair strands”, three buttons, two pupils, two eye outlines, one carrot nose, one hat, one stripe for the hat, one cane, and one bottom piece of the cane. Then cut out the shapes you traced. These will be used as your stencils for the felt. Then, trace Olaf’s head on plain white felt. Next, trace the two bottom pieces of his body and his legs on the sparkly white felt. Trace his arms, eyebrows, and hair on brown felt. Then trace his buttons and pupils on black felt. Following that, trace the outline of his eyes on light blue felt. Next, you will trace his carrot nose on orange felt, then his hat on beige felt, and the stripe on his hat on red felt.
Next will be his cane on dark brown felt and the bottom of the cane on light brown felt. Cut out all of the body parts you traced. Place pieces of magnetic tape on the back of the head, both bottom body pieces, both legs, both arms, the three hair pieces, the hat, and the cane. They will need to be pretty thin pieces for the hair. You may want to hot glue the pieces of magnetic tape so they stay in place better. You are now ready to build Olaf! Place the magnetic pieces on the refrigerator to form Olaf’s body (you may choose to give him a hat or hair on the top of his head). Then place the rest of the felt pieces in place to form his buttons and his face (the felt should stick to itself without any adhesive).
7. Olaf Recycled Craft
Crystal and Comp shared this recycled coffee creamer project as part of a Christmas craft, but truth be told, it’s an entirely doable endeavor any time of year, whenever you have an empty container on-hand.
Materials:
- One empty International Delight Coffee Creamer container (other brand creamers of the same shape would work)
- A can of white spray paint
- A can of glitter blast glitter spray
- Orange, white, and black felt
- Two black pipe cleaners
- Two small tree twigs or sticks
- Hot glue gun and glue
- Poly-fil
Directions:
Remove the wrapper from the coffee creamer. Spray paint the entire container white, including the lid. Once dry, add a coat of the glitter blast spray over the white spray paint. Let it dry 100%. You will have a sparkly snowman! Meanwhile, take a sheet of orange felt. Cut a triangle with the felt. Follow the images below to create a nose for Olaf. The bottom of the triangle should be cut flat. Use hot glue to seal the cone shape and stuff with Poly-fil. Set it aside. Use black felt and cut out two circles that are one and a half inches in diameter. Next, cut out two white circles that are one and a fourth inches in diameter. Then cut out five more black circles that are three fourths of an inch in diameter. Two will be for eyes and three of them will be for the snowman buttons. Cut out two arched eyebrows out of the black felt. Hot glue the eyes in layers to the dry coffee creamer container. Glue on the nose and eyebrows. Glue on the black circles that are buttons. One at a time, glue on the sticks for arms. You will have to hold them in place while the hot glue dries. Use the two pipe cleaners and cut them down to make three pieces of Olaf hair. One hair is taller than the other two. Hot glue them on the back of the coffee creamer cap.

Related: Create Your Own IG-11 this Hanukkah with a DIY Dreidel
6. Magic Olaf Paint
What kid doesn’t like to paint? And if you and yours are a fan of all things Frozen, then you may want to take stock of this DIY Olaf-inspired paint recipe that’s fairly easy to make.
Materials:
- Water
- Sea salt or epsom salt
- Paper (black paper works best)
- Optional Olaf-themed coloring page
Directions:
Fill a cup with one or two cups of water depending on how many participants there are. Add salt and stir to dissolve the salt. Keep adding salt and stirring until it stops dissolving (the mixture has become saturated)-now your paint is ready. Apply the paint to black paper or coloring page. Set the painting in the sun to dry and wait for the magic to happen. The paper will get warm, the water will evaporate, and the salt in the magic paint will remain.
Related: DIY – Adorable Glow-in-the-dark Hairstyle
5. Olaf Shirt
We discovered this easy-to-follow no-sew Olaf shirt on Mom Endeavors. And once it’s done and ready to wear, we guarantee it will feel as comforting as a warm hug.
Materials:
- White T-shirt(s) from a craft store
- White, black, and orange fabric paint
- Pencil to sketch with
- Olaf face template
Directions:
Slide the Olaf template inside the shirt to trace Olaf’s face onto the shirt. Once you have the face traced on, then you just fill in with your paints! I started at the top and worked my way down (to help minimize the likelihood of accidentally setting my hand in wet paint). I just outlined the eyes with black, but I didn’t do the insides white (I just let the shirt show through). I wanted Olaf’s big snowy tooth to stand out though, so I did use white paint for that. I filled in the black for his mouth first and then the last thing I did was the white tooth.

Related: Top 5 Things REAL Disney Fans Should Wear Into The Parks
4. Indoor Olaf-Themed Games
Because being cooped up inside can make anyone a little stir-crazy, some Olaf-inspired game diversions may be in order. What’s more, you can take note of these for birthday parties or other events with children in the future. Our first recommendation is creating your own “Pin the Nose on Olaf” game—a themed take on the classic “Pin the Tail on the Donkey” game we are all largely familiar with. We found this example provided by Jennifer McLaughlin on Creative Child.
Here’s What You Need:
- Scissors
- Cutout of Olaf
- Precut letters (or use a Cricut cutting machine if you have one, with caution)
- Colorful paper in 12X12 squares
- Cardboard or poster-board
- Glue or tape
- Sticky tack or Velcro
Directions:
Cut out the large-sized Olaf. You can get one by finding a poster, an online printable, etc. You can also use an Olaf frozen party craft tablecloth or any other paper decoration with a large enough image. On a piece of cardboard or poster board, glue down the Olaf Cutout in the center. If you plan to use Velcro, attach the correct side of the sticky Velcro to his nose. Spell out “Pin the Nose on Olaf”.
You can either cut out letters using the Cricut or use precut letters from the party store. Cut out orange triangles or “Carrots” for Olaf's nose. Attach sticky tack or Velcro to the backs of the carrots. Cut out the letters you need for the game title and any other decorations you might want to add. Attach the letters around Olaf and securely attach your Frozen Party craft “Pin the Nose on Olaf” game to the wall.
We also found an excellent printout online for designing your very own Olaf-themed Bowling game. The instructions are pretty straightforward and largely involve printing out an Olaf pin template. You can get yours and follow along with Katie at A Little Pinch of Perfect.
Related: Funko Debuts Disney Games Based on Toy Story, the Haunted Mansion, “it’s a small world,” and More
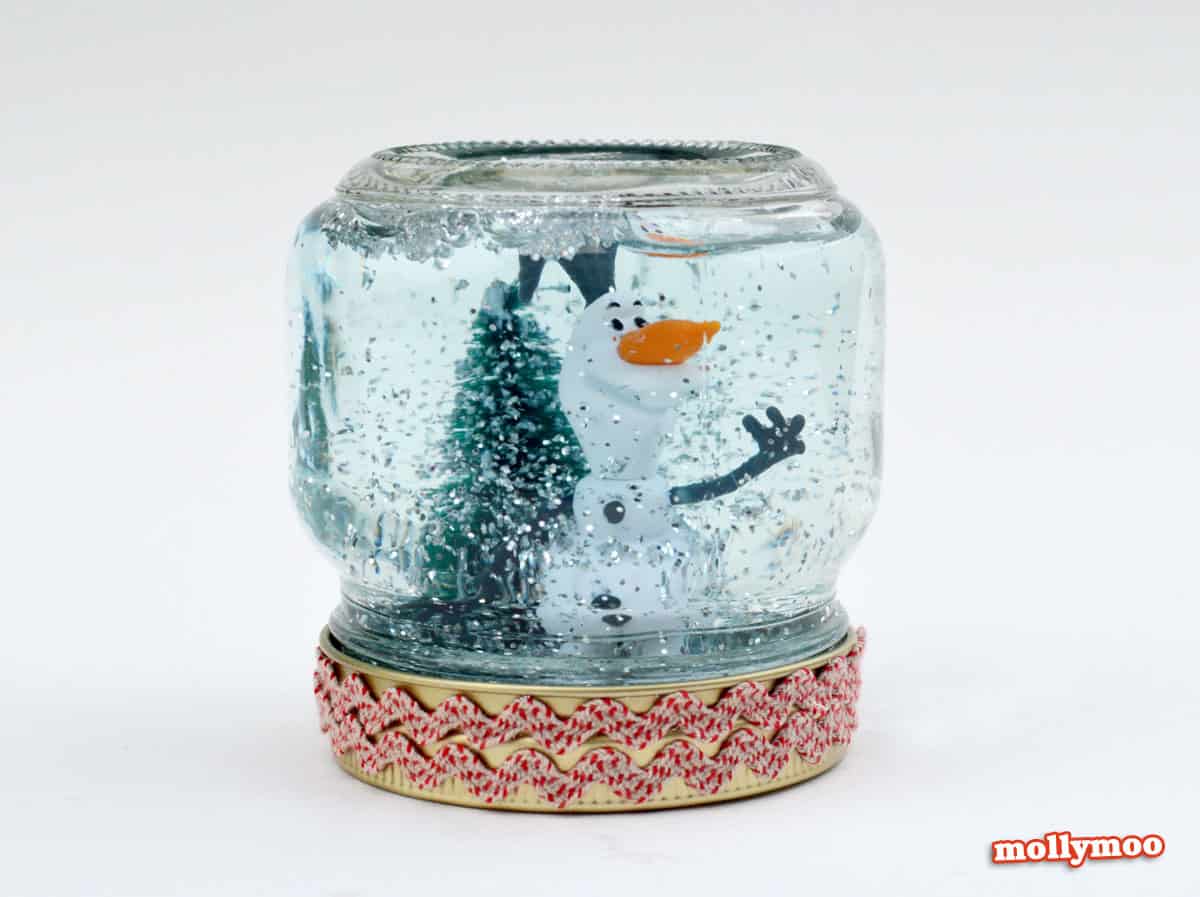
3. Frozen Snow Globe With Olaf Inside
Here is another awesome Frozen-inspired craft we found on MollyMoo. This one is extremely easy to make but gives off an intricate presentation that can be mistaken for a store-bought decoration.
Materials:
- Kilner (or similar) canning jars
- Super glue
- Glitter
- Plastic Olaf figurines
- Additional décor items (crafting trees, snow, etc.)
- Hot glue gun and glue
Directions:
Place figurine and figurine items inside the lid of the jar. Depending on the height of the lid you may, as I did, have to put a little styrofoam under your figurines to lift them up a bit. Once all looks well, glue the items into place using the super glue. While the glue is setting fill the jar almost to the top with cool tap water. Time to test again–insert the lid with the figurines into the jar of water, tighten and turn upside down to test the water level – ensure the water level is over the top of the figurines, with a little room to spare at the top. Now remove the lid again, add the glitter to the water jar and stir. With your glue gun, run a ring of glue around the inside of the lid and as quickly as you can (before the glue hardens) close the lid on the jar and tighten, tighten, tighten.
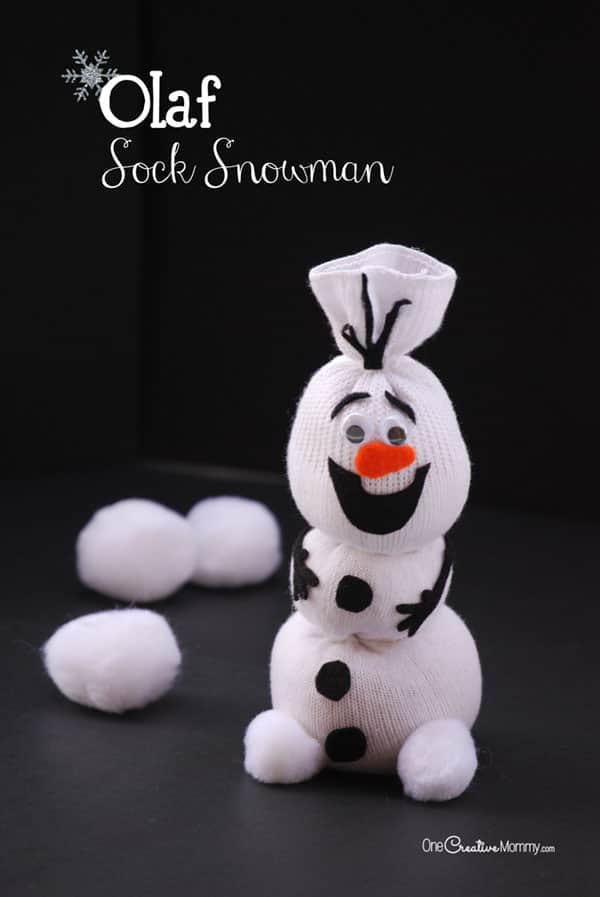
2. Olaf Sock Snowman
This is one of the most top-rated, re-shared Olaf-themed DIYs we’ve found posted all over the web. We’re sharing this one we found from Heidi at One Creative Mommy.
What You Need:
- One bobby sock
- Approximately 1 1/3 cups of rice (for larger socks, use more rice)
- Two one-inch pom poms
- Orange felt—just a small piece
- Large googly eyes
- Adhesive-backed black felt—one sheet of sticky-backed felt is enough for 12 snowmen
- Three clear hair elastics
- Hot glue gun and glue
- Free Olaf features printable (online)
Directions:
Pour just under 3/4 cup rice into the bottom of the sock, and squeeze and shake it down until you have the shape you want for Olaf's bottom. Make sure that the top of the sock is centered in the middle. Using a clear hair band, secure sock tightly just above the rice. Pour just over 1/8 cup of rice into the sock, squeeze and shake down the rice, and secure the section with a second clear hairband. Pour a little less than half a cup of rice into the sock, and squeeze and shake down the rice. Shape the head so that it is taller than it is wide, and secure it with the third clear hairband. Starting where the middle section touches the bottom section, secure the ball with hot glue so that Olaf keeps his shape.
Repeat where the head and middle ball touch. Starting with the mouth, peel the backing off the felt pieces (one at a time), and stick them to Olaf's face and body. Any old triangle-ish shape you make on your own will do. Glue the nose and eyes on with hot glue. Add the arms and the pom-pom feet. Don't forget the hair! Be sure to attach it at the bottom of the elastic hair tie, or it will look like it's floating. Per Heidi’s recommendation, add eyebrows if you desire, although the original instructions did not include eyebrows.
1. Sparkling Snow Play Dough
This final frozen folly lets you build your own snowman (in this case, Olaf) right in the warmth and comfort of your own home. It’s really a DIY recipe to create your own moldable play dough at home. For the purpose of the theme at hand, however, we reiterate that we’re using ours for the purpose of shaping our very own Olaf. But you can have fun making Snowgies, Marshmallow, and other snow favorites as depicted in the movie as well. Shared with us via Katie from A Little Pinch of Perfect, here’s how to proceed.
Materials:
- One cup of flour
- One cup of water
- 1/4 cup of salt
- One table of vegetable oil
- Two teaspoons of cream of tarter
- White/silver glitter
Directions:
Mix all the ingredients together and cook on medium heat and stir constantly. You don’t want it to burn. The mixture will get hard to stir and look like cookie dough. Remove from heat and let it cool. Add glitter and knead the dough, then it’s ready to be played with.
If the dough feels a bit stiff, add drops of water and knead it in until the dough has reached the right consistency. You can get creative and use as-is or follow along with an Olaf image or build your own personal snowman creation using the optional instructions below.
For Building A Snowman (optional):
- Snowman cookie cutter
- Googly eyes
- Buttons
- One orange triangle cut from a foam craft sheet
- Two mini popsicle sticks or twigs
Instructions:
You can get creative with these fairly self-explanatory items to mold and shape Olaf or another Frozen favorite or personal creation that is all your own. Enjoy!
There are many other interestingly icy ways in which you can bring Olaf (or other Frozen-themed) activities into your home this winter. This is just one of the many ways to keep out the chill while enjoying the magic of Disney this winter, regardless of whether the weather keeps you inside or not.